
설치 방법
Nest.js 에서 Google TypeScript Style 을 적용하는 방법을 소개하고자 한다.
Visual Studio Code 익스텐션 설치
아래의 링크를 통해 익스텐션을 각각 설치한다.
- ESLint : https://marketplace.visualstudio.com/items?itemName=dbaeumer.vscode-eslint
- Prettier : https://marketplace.visualstudio.com/items?itemName=esbenp.prettier-vscode
gts 라이브러리 설치
터미널에 아래의 명령어를 입력한다.
1
 npx gts init
자동으로 gts 라이브러리 사용할 수 있도록 여러 파일들을 자동으로 세팅해준다. Nest.js 프레임워크는 기본적으로 eslint 와 prettier 설정을 해준다. 그래서
tsconfig.json이나package.json과 같은 파일이 이미 생성되어 있기 때문에 파일을 덮어쓸 것인지 물어본다. 프로젝트 환경에 맞게 설정해주면 되지만, 가능하면 Nest.js 라이브러리에 맞추기 위해 파일은 덮어쓰지 않았다.1 2 3 4 5 6 7 8 9 10 11 12 13 14 15 16 17 18 19 20 21 22 23 24 25 26 27 28 29 30 31 32 33 34 35 36 37 38 39 40 41 42 43 44 45 46 47 48 49 50 51 52 53 54 55 56 57 58 59 60 61 62 63 64 65 66 67
# TypeScript 버전 업데이트 여부 (No) Already have devDependency for typescript: -^5.1.3 +~5.2.0 ? Overwrite No # TypeScript 버전 업데이트 여부 (No) Already have devDependency for @types/node: -^20.3.1 +20.8.2 ? Overwrite No # package.json 파일 lint 명령어 업데이트 여부 (No) package.json already has a script for lint: -eslint "{src,apps,libs,test}/**/*.ts" --fix +gts lint ? Replace No Writing package.json... (node:78607) [DEP0174] DeprecationWarning: Calling promisify on a function that returns a Promise is likely a mistake. (Use `node --trace-deprecation ...` to show where the warning was created) { scripts: { build: 'nest build', format: 'prettier --write "src/**/*.ts" "test/**/*.ts"', start: 'nest start', 'start:dev': 'nest start --watch', 'start:debug': 'nest start --debug --watch', 'start:prod': 'node dist/main', lint: 'gts lint', test: 'jest', 'test:watch': 'jest --watch', 'test:cov': 'jest --coverage', 'test:debug': 'node --inspect-brk -r tsconfig-paths/register -r ts-node/register node_modules/.bin/jest --runInBand', 'test:e2e': 'jest --config ./test/jest-e2e.json', clean: 'gts clean', compile: 'tsc', fix: 'gts fix', prepare: 'npm run compile', pretest: 'npm run compile', posttest: 'npm run lint' }, devDependencies: { '@nestjs/cli': '^10.0.0', '@nestjs/schematics': '^10.0.0', '@nestjs/testing': '^10.0.0', '@types/express': '^4.17.17', '@types/jest': '^29.5.2', '@types/node': '^20.3.1', '@types/supertest': '^2.0.12', '@typescript-eslint/eslint-plugin': '^6.0.0', '@typescript-eslint/parser': '^6.0.0', eslint: '^8.42.0', 'eslint-config-prettier': '^9.0.0', 'eslint-plugin-prettier': '^5.0.0', jest: '^29.5.0', prettier: '^3.0.0', 'source-map-support': '^0.5.21', supertest: '^6.3.3', 'ts-jest': '^29.1.0', 'ts-loader': '^9.4.3', 'ts-node': '^10.9.1', 'tsconfig-paths': '^4.2.0', typescript: '^5.1.3', gts: '^5.2.0' } } # tsconfig.json 파일 덮어쓰기 여부 (No) ./tsconfig.json already exists ? Overwrite No
설치를 완료하면 총 3개의 파일이 생성되고, 2개의 파일이 수정된다.
- 새롭게 생성되는 파일
.editorconfig: 서로 다른 IDE 를 사용할 경우, 공통된 포맷을 유지할 수 있도록 설정하는 파일이다. Visual Studio Code 에서 사용하기 위해서는 익스텐션을 설치해야 하지만, 이번 글에서는 별도로 설치하지 않는다..eslintignore: eslint 를 적용하지 않을 파일이나 폴더를 명시한다. 빌드 후 생성되는build폴더의 파일은 적용하지 않는다..prettierrc.js: gts 의 prettier 규칙을 적용하기 위한 파일을 불러온다.
- 수정되는 파일
package-lock.json,package.json: gts 라이브러리가 devDependencies 에 추가되면서 업데이트가 발생한 것이다.
- 새롭게 생성되는 파일
tsconfig.json 파일 편집
gts 에서 제공하는 기본 tsconfig.json 파일을 적용해야 한다.
tsconfig.json 파일은 TypeScript 파일을 JavaScript 로 변환할 때 어떤 규칙을 적용할 것인지 명시해놓은 파일이다.
아래의 코드를 tsconfig.json 파일에 추가했다.
1
"extends": "./node_modules/gts/tsconfig-google.json"
전체 파일의 내용은 아래와 같다.
1
2
3
4
5
6
7
8
9
10
11
12
13
14
15
16
17
18
19
20
21
22
{
  "extends": "./node_modules/gts/tsconfig-google.json",
  "compilerOptions": {
    "module": "commonjs",
    "declaration": true,
    "removeComments": true,
    "emitDecoratorMetadata": true,
    "experimentalDecorators": true,
    "allowSyntheticDefaultImports": true,
    "target": "ES2021",
    "sourceMap": true,
    "outDir": "./dist",
    "baseUrl": "./",
    "incremental": true,
    "skipLibCheck": true,
    "strictNullChecks": false,
    "noImplicitAny": false,
    "strictBindCallApply": false,
    "forceConsistentCasingInFileNames": false,
    "noFallthroughCasesInSwitch": false
  }
}
extends 속성에 명시된 tsconfig-google.json 파일 내부에 있는 속성들과 tsconfig.json 파일의 속성들이 겹치는 경우가 있다.
겹치는 속성에 대해서는 extends 에 명시된 파일이 아닌 현재 파일인 tsconfig.json 에 명시된 속성이 적용된다. 그리고 겹치지 않는 속성들은 각각 적용된다.
.prettierrc 파일 삭제
Nest.js 가 기본으로 생성한 .prettierrc 파일은 삭제한다.
gts 라이브러리를 사용하기 위해 .prettierrc.js 파일을 사용할 것이기 때문이다.
.eslintrc.js 파일 편집
Nest.js 프로젝트 생성 시 루트 디렉토리에 .eslintrc.js 파일이 아래와 같이 기본적으로 생성되어있을 것이다.
1
2
3
4
5
6
7
8
9
10
11
12
13
14
15
16
17
18
19
20
21
22
23
24
25
26
// .eslintrc.js
module.exports = {
  parser: '@typescript-eslint/parser',
  parserOptions: {
    project: 'tsconfig.json',
    tsconfigRootDir: __dirname,
    sourceType: 'module',
  },
  plugins: ['@typescript-eslint/eslint-plugin'],
  extends: [
    'plugin:@typescript-eslint/recommended',
    'plugin:prettier/recommended',
  ],
  root: true,
  env: {
    node: true,
    jest: true,
  },
  ignorePatterns: ['.eslintrc.js'],
  rules: {
    '@typescript-eslint/interface-name-prefix': 'off',
    '@typescript-eslint/explicit-function-return-type': 'off',
    '@typescript-eslint/explicit-module-boundary-types': 'off',
    '@typescript-eslint/no-explicit-any': 'off',
  },
};
extends 속성 배열에 아래의 값을 추가한다.
1
'./node_modules/gts/'
수정 이후 파일 내용은 아래와 같다.
1
2
3
4
5
6
7
8
9
10
11
12
13
14
15
16
17
18
19
20
21
22
23
24
25
26
module.exports = {
  parser: '@typescript-eslint/parser',
  parserOptions: {
    project: 'tsconfig.json',
    tsconfigRootDir: __dirname,
    sourceType: 'module',
  },
  plugins: ['@typescript-eslint/eslint-plugin'],
  extends: [
    'plugin:@typescript-eslint/recommended',
    'plugin:prettier/recommended',
    './node_modules/gts/', // 추가한 부분
  ],
  root: true,
  env: {
    node: true,
    jest: true,
  },
  ignorePatterns: ['.eslintrc.js'],
  rules: {
    '@typescript-eslint/interface-name-prefix': 'off',
    '@typescript-eslint/explicit-function-return-type': 'off',
    '@typescript-eslint/explicit-module-boundary-types': 'off',
    '@typescript-eslint/no-explicit-any': 'off',
  },
};
package.json 파일 편집
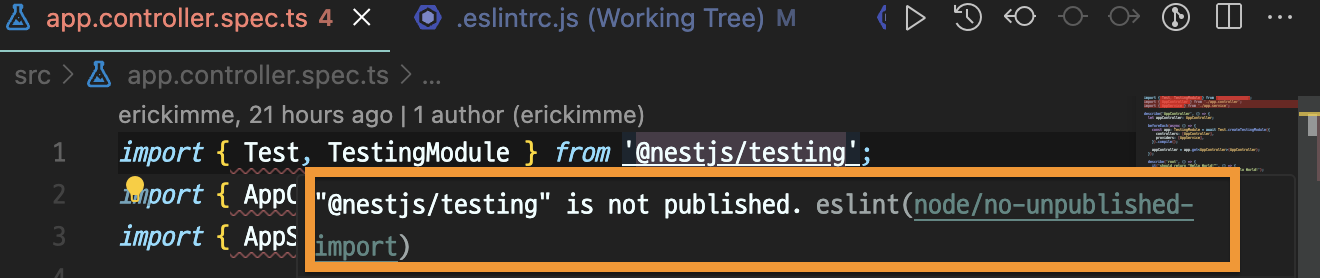
그리고 test 코드를 작성할 때 사용하는 @nestjs/testing 라이브러리를 gts 의 규칙인 no-unpublished-import 규칙을 통과하지 못해서 아래의 코드에서 eslint 오류가 발생한다.
1
2
import { Test, TestingModule } from '@nestjs/testing';
// "@nestjs/testing" is not published. eslint(node/no-unpublished-import)
이는 package.json 파일에 @nestjs/testing 라이브러리가 devDependencies 에 포함되어 있기 때문에 발생하는 경고 메세지이다. no-unpublished-import 규칙은 애플리케이션을 배포할 때 라이브러리를 찾지 못해서 발생할 수 있는 오류를 방지하기 위해 쓰인다.
해결 방법은 package.json 파일에 해당 라이브러리를 published 상태로 만들면 된다.
아래의 코드를 package.json 파일에 추가한다.
1
"files": ["@nestjs/testing"]
파일의 전체 내용은은 아래와 같다.
1
2
3
4
5
6
7
8
9
10
11
12
13
14
15
16
17
18
19
20
21
22
23
24
25
26
27
28
29
30
31
32
33
34
35
36
37
38
39
40
41
42
43
44
45
46
47
48
49
50
51
52
53
54
55
56
57
58
59
60
61
62
63
64
65
66
67
68
69
70
71
72
73
74
75
76
77
{
  "name": "nest-backend",
  "version": "0.0.1",
  "description": "",
  "author": "",
  "private": true,
  "license": "UNLICENSED",
  "scripts": {
    "build": "nest build",
    "format": "prettier --write \"src/**/*.ts\" \"test/**/*.ts\"",
    "start": "nest start",
    "start:dev": "nest start --watch",
    "start:debug": "nest start --debug --watch",
    "start:prod": "node dist/main",
    "lint": "eslint \"{src,apps,libs,test}/**/*.ts\" --fix",
    "test": "jest",
    "test:watch": "jest --watch",
    "test:cov": "jest --coverage",
    "test:debug": "node --inspect-brk -r tsconfig-paths/register -r ts-node/register node_modules/.bin/jest --runInBand",
    "test:e2e": "jest --config ./test/jest-e2e.json",
    "clean": "gts clean",
    "compile": "tsc",
    "fix": "gts fix",
    "prepare": "npm run compile",
    "pretest": "npm run compile",
    "posttest": "npm run lint"
  },
  "dependencies": {
    "@nestjs/common": "^10.0.0",
    "@nestjs/core": "^10.0.0",
    "@nestjs/platform-express": "^10.0.0",
    "reflect-metadata": "^0.1.13",
    "rxjs": "^7.8.1"
  },
  "devDependencies": {
    "@nestjs/cli": "^10.0.0",
    "@nestjs/schematics": "^10.0.0",
    "@nestjs/testing": "^10.0.0",
    "@types/express": "^4.17.17",
    "@types/jest": "^29.5.2",
    "@types/node": "^20.3.1",
    "@types/supertest": "^2.0.12",
    "@typescript-eslint/eslint-plugin": "^6.0.0",
    "@typescript-eslint/parser": "^6.0.0",
    "eslint": "^8.42.0",
    "eslint-config-prettier": "^9.0.0",
    "eslint-plugin-prettier": "^5.0.0",
    "jest": "^29.5.0",
    "prettier": "^3.0.0",
    "source-map-support": "^0.5.21",
    "supertest": "^6.3.3",
    "ts-jest": "^29.1.0",
    "ts-loader": "^9.4.3",
    "ts-node": "^10.9.1",
    "tsconfig-paths": "^4.2.0",
    "typescript": "^5.1.3",
    "gts": "^5.2.0"
  },
  "jest": {
    "moduleFileExtensions": [
      "js",
      "json",
      "ts"
    ],
    "rootDir": "src",
    "testRegex": ".*\\.spec\\.ts$",
    "transform": {
      "^.+\\.(t|j)s$": "ts-jest"
    },
    "collectCoverageFrom": [
      "**/*.(t|j)s"
    ],
    "coverageDirectory": "../coverage",
    "testEnvironment": "node"
  },
  "files": ["@nestjs/testing"] // 추가한 부분
}
Visual Studio Code 설정 변경
Workspace 단위로 설정하기
Visual Studio Code 에서는 Workspace 단위 설정과 User 단위 설정이 가능하다.
- Workspace : 현재 작업 중인 폴더에서만 적용할 Visual Studio Code 설정이 가능하다. 최상단 디렉토리에
.vscode폴더에settings.json파일로 저장된다. - User : 모든 폴더에서 전역으로 적용할 Visual Studio Code 설정이 가능하다.
Workspace 단위 설정은 다른 사람들과 함께 작업한다면 공통되는 설정을 적용하고 싶을 때 사용하면 되고, User 단위 설정은 개인 개발 환경을 맞추고 싶을 때 사용한다.
이번 글에서는 Workspace 단위로 적용하는 방법을 소개하고자 한다.
파일 저장 시 ESLint, Prettier 적용
파일 저장 단축키 버튼 cmd+s (윈도우는 ctrl+s)를 눌렀을 때, ESLint 규칙과 prettier 이 적용되도록 설정할 수 있다.
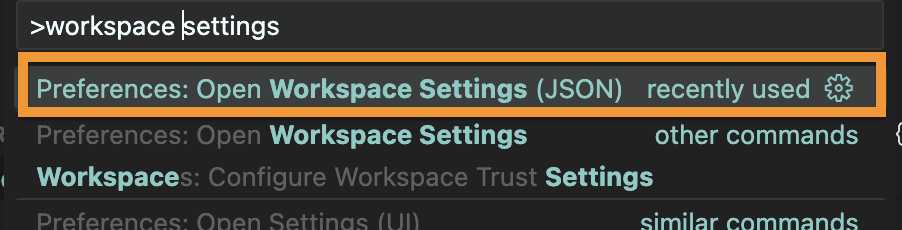
cmd+shift+p를 누르고Preferences: Open Workspace Settings (JSON)을 찾아서 선택한다. 그러면 자동으로.vscode폴더에settings.json파일이 생성된다.
settings.json파일이 열리면 아래의 코드를 추가한다.1 2 3 4 5 6
{ "editor.codeActionsOnSave": { "source.fixAll.eslint": true }, "editor.formatOnSave": true, }
적용 여부 확인
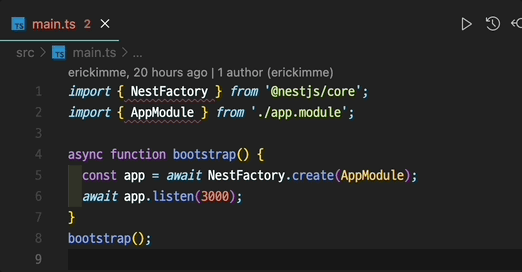
src/main.ts 파일을 열고, 파일 저장 단축키를 입력해서 eslint 와 prettier 가 잘 적용되는지 확인한다.
참고자료
- gts [github]
- ESLint 상세 설정 가이드 [daleseo]
- node/no-unpublished-import [github]
- package.json [npm]